
Today I’ve learnt how to use git-bisect and that’s what I found out.
Initial scenario
The typical use case in which git bisect can help us making our lives easier is the following one:
Let’s assume that we are working on a project and that we finally achieve a stable version, let’s tag it as version v1.0.0. After that, our work continues adding new features and so on. Some commits before we reach the point in which we think we should release a new version, that version might be tagged as v1.1.0-rc. Unfortunately, during the release process we discovered that one of the features previously implemented is no longer working as expected (we should have noticed that in our tests… but they were not testing this specific case in which the bug comes to light1…). We certainly know that this were not happening on version v1.0.0, so that we have identified two points in our history with statuses good and bad, separated by a non-negligible number of commits.
In that case, knowing the commit in which the things started to go wrong is really useful in order to fix the problem. Therefore, we could start checking every commit one-by-one to identify the exact point in which the bug was introduced… I’m feeling lazy!

And here is where git bisect comes into play.
What’s git-bisect for?
Bisect is a git function that allows the developer to automatically iterate over several commits in order to check them interactively. That’s specially useful when trying to find the point where a bug enters the scene, although that’s not the only application of git-bisect.
This tool guides you through the commits in a non linear way using a binary search algorithm. This is a cool application to go through an ordered list of elements to find the one that meets a condition, significantly reducing amount of steps to achieve our goal.
The only thing we know at first is that in some point in the history of our project everything was working flawlessly (version v1.0.0 in our example) and that in other point we realised that not everything was working as expected (v1.1.0-rc). The intermediate commits status is unknown at this point.

Starting the analysis
In order to start the bisecting process it is needed to establish the start and finish commits between whom the bug was introduced. We can specify it directly as follows:
$ git bisect start <start-commit> <end-commit>Other option is to start the analysis and set separately the last known good commit and the first bad commit we currently know, usually HEAD. In our example it might look like this:
 $ git bisect start
 $ git bisect bad HEAD
 $ git bisect good v1.0.0
When the bisecting process is started, git will be guiding us through the commits “jumping” among them, which will allow us to check every thing needed in order to discover if the bug is present or not in the commit under analysis.
It’s possible to abandon the bisect process anytime. That will restore the git repository to the status we were just before starting the analysis.
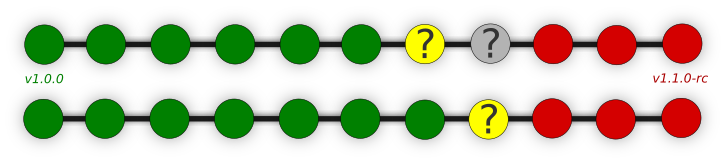
$ git bisect resetAs we previously said, git bisect goes through the commits in a non linear way, applying a binary search algorithm. In the following figure the commit under analysis is the yellow one, halfway between the last known good commit and the first known bad commit.

In order to advance in the process it is needed to set the commit under analysis either as good or bad.
$ git bisect goodIn our example, thanks to our input, git now knows that every commit between the one tagged with version v1.0.0 and the one we’ve just tagged as good are all correct and that there is not our bug.

After tagging the commit, git-bisect bring us to the next commit to analyze. We’ll have to start over again and determine if the new commit under analysis is good or bad.
Some iterations later, we should arrive to the point in which git must be able to determine the first commit containing the bug. Work Done!

Possible problems
During the analysis and checking process is possible to tag some commit incorrectly. How can we deal with that situation?
- We can restart the process loosing all the previous tags set.
 $ git bisect reset
$ git bisect start- When restarting the process is not an option, we can use the log subcommand in order to store the tags we’ve set in a file. After that, we can fix any error we’ve made tagging the commits just editing the file we’ve saved and reload it again using the replay subcommand.
 $ git bisect log > bisect_log_file
 $ vim bisect_log_file
 $ git bisect replay bisect_log_file
Et voilà!
Other thing that might happen is that, at some point, we can find commits in which it is not possible to determine if the bug is present or not, or even if we certainly know that commit did not introduce the bug. In that case is possible to skip the commit analysis using:
$ git bisect skipBisecting like a pro
This is clearly a repetitive process… so that it is possible to automate if we can build a script including the checks to perfom in each commit. This script must return a code between 1 and 127 (except 1252) when the commit under analysis must be tagged as bad or 0 if it must be tagged as good. Any other exit code will abort the process.
That’s how we can perform an analysis using a script:
$ git bisect run <script> <script_arguments>Conclusions
That’s what I’ve learnt about git-bisect. I think it’s a very useful tool which can save us from wasting a lot of time when debugging. Just remember, git is your friend.
As always, you can find detailed information in git-scm.